table of contents :
1 – install on Windows
2 – install on Linux
1 – Install on Windows
To use the OpenCV library you have two options:
– installation by using the Pre-built libraries, or
– installation by making your own Libraries from the source file.
While the first one is easier to complete, it only works if you are coding with the lastest Microsoft Visual Studio IDE and doesn’t take advantage of the most advanced technologies we integrate into our library.
It is generally recommended to download the source .zip file package and rebuild OpenCV from scratch using the same compiler that you will use to build your application. Visual studio users can skip this section since their installation comes with pre-built DLL and LIB files.
-> http://docs.opencv.org/doc/tutorials/introduction/windows_install/windows_install.html * * * *
OpenCV and Qt
If you want to use OpenCV in QT, so you must compile it with mingw.
http://vijaysringeri.blogspot.pt/2013/01/building-opencv-libraries-for-linux-on.html
http://eyalarubas.com/opencv-installation-on-windows-netbeans-mingw.html
1.1 Download OpenCV source
Download Source files : https://github.com/Itseez/opencv
Download older versions : https://github.com/Itseez/opencv/releases

Alternatively, you can just download an archived version of the source files from : http://sourceforge.net/projects/opencvlibrary/files/
Choose a build you want to use ( ios, Linux, Windows..), download it, and unpack to a path you choose.
http://docs.opencv.org/doc/tutorials/introduction/windows_install/windows_install.html
You will find two folder there one is 1. build and 2. sources.
Dll / Lib Files
“Libraries are used because you may have code that you want to use in many programs. For example if you write a function that counts the number of characters in a string, that function will be useful in lots of programs. Once you get that function working correctly you don’t want to have to recompile the code every time you use it, so you put the executable code for that function in a library, and the linker can extract and insert the compiled code into your program. Static libraries are sometimes called ‘archives’ for this reason.” Charles E. Grant.
Compiling your code into libraries also encourages good design practices, e.g. designing your classes to be used in different types of applications.
.h : header file, wwritten in the C/C++ language
its a source file containing declarations (as opposed to .cpp containing implementations)
.lib : static library may contain code or just links to a dynamic library.
It’s compiled code that you link with your program. The static library is included in your .exe at link time.
Either declares the binary interface to a dynamic library (DLL) or contains the binary code of a library.
.dll : dynamic library.
your application shares these with the system or you use them to keep your code base organized.
Just like a static one but you need to deploy it with your .exe file because its loaded at run time.
These typically end in .so, .dll
1.2 Install MinGW / MSYS
http://www.mingw.org/wiki/Getting_Started
download from : http://sourceforge.net/projects/mingw/
select following packages to install :

MSYS, a contraction of “Minimal SYStem”, is a Bourne Shell command line interpreter system. Offered as an alternative to Microsoft’s cmd.exe, this provides a general purpose command line environment, which is particularly suited to use with MinGW, for porting of many Open Source applications to the MS-Windows platform; a light-weight fork of Cygwin-1.3, it includes a small selection of Unix tools, chosen to facilitate that objective.
MSYS is a collection of GNU utilities such as bash, make, gawk and grep to allow building of applications and programs which depend on traditionally UNIX tools to be present. It is intended to supplement MinGW and the deficiencies of the cmd shell.
After the installation finished, add C:\MinGW\bin to your system path
Open Control Panel → System → Advanced system settings → Advanced Tab → Environment variables...

restart the computer, and test typing in the command-line box …
g++ –version

Within the “etc” directory, there should be a file named “fstab“; (if not, create one, as a new text file).
in my there was not, there was a file “fstab.sample”
Edit the file and ensure that it contains one line, (there may be others), which reads:
C:\MinGW /mingw
Before you save the file, ensure that there is at least one blank line at the bottom, below all of the entries that may exist,
then save and close the file.
1.3 makefiles : install Cmake
make is sort of a batch process for compiling/linking/building, etc. You could do all of these steps manually, or you can just use make.
“If your program consists of a only a few files that can be built with a simple command line invoking the compiler, then make may be superfluous. However, in large projects you may have dozens of files that require complex compiler and linker options, then make or a similar tool becomes a necessity. Consider, if you have a project with 50 C++ source files, and you change just one of them, you don’t want to have re-compile all of them. You’d much rather just re-compile the one file that changed and re-link with the existing object files for the rest of them. Tools like make automatically take care of chores like that.
The make language has a number of warts, and I don’t think it is anybody’s favorite programming language. It is also very tricky to write a makefile that will work on multiple platforms, say Linux, OS X, and Windows. Tools like cmake can be used to generate makefiles that will work on multiple platforms, and lets you describe the process of building your software in a language that is arguably less ugly than make proper.
“As an example, almost every program written in ‘C’ will need functions from a library called the ‘C runtime library, though few programs will need all of the functions. The C runtime comes in both static and dynamic versions, so you can determine which version your program uses depending on particular needs.” Charles E. Grant.
GNU Make http://www.gnu.org/software/make/
CMake stands for Cross-platform Make. http://www.cmake.org/cmake/help/cmake_tutorial.html
Cmake vs Make http://prateekvjoshi.com/2014/02/01/cmake-vs-make/
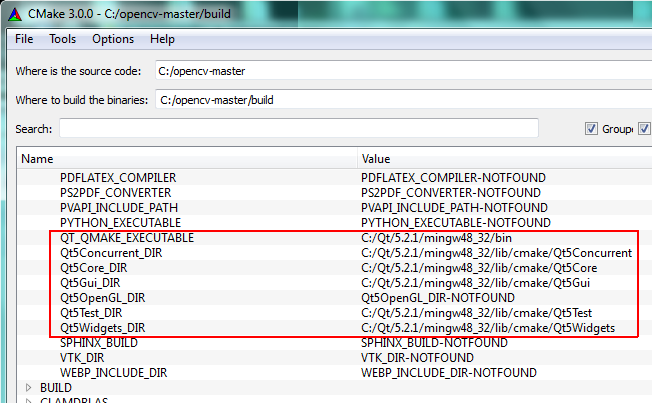
1.4 Launch CMake

.

.
You can use Qt as HighGUI backend on any platform (Linux, Windows, Mac) by passing WITH_QT = ON

.
You will have to complete the path of Qt directories :
.
Qt Cmake files path :

The clik “Configure” again until no more errors ( Red parts ) and the “Generate” to get build configuration files.

1.5 Run MingW
Now open “MinGW” shell and change directory to OpenCV build directory which you have created
RUN -> C:\MinGW\msys\1.0\msys.bat
and execute command “mingw32-make.exe” to build opencv source code


Once the build is complete, run “mingw32-make install” to get all the libraries, included files and documentation in the install folder.
For convenience, we should add the directory C:/opencv/release/bin to the system PATH.
This will make sure our programs can find the needed DLL’s to run.
OpenCV installation comes with pre-built DLL and LIB files by Visual studio :
The letter d at the end just indicates that these are the libraries required for the debug

After all these stpes installation I don’t have the headers that I was expecting to have under build/opencv2 …
In the command prompt, had to type “cmake -P cmake_install.cmake”, in my build directory.

And finally a folder ..\build\install\include\opencv2 was generated, as also
C:\OpenCV2.4.8\build\install\x86\mingw\bin
C:\OpenCV2.4.8\build\install\x86\mingw\lib
ver http://answers.opencv.org/question/31418/missing-hhp-files-after-installing-with-cmake/
falam de CMAKE_INSTALL_PREFIX
http://kevinhughes.ca/tutorials/opencv-install-on-windows-with-codeblocks-and-mingw/
http://docs.opencv.org/doc/tutorials/introduction/windows_install/windows_install.html
http://qt-project.org/forums/viewthread/41610
http://stackoverflow.com/questions/10860352/getting-started-with-opencv-2-4-and-mingw-on-windows-7
.
.
To finalize the installation go to the Set the OpenCV enviroment variable and add it to the systems path section.reference : http://docs.opencv.org/doc/tutorials/introduction/windows_install/windows_install.html
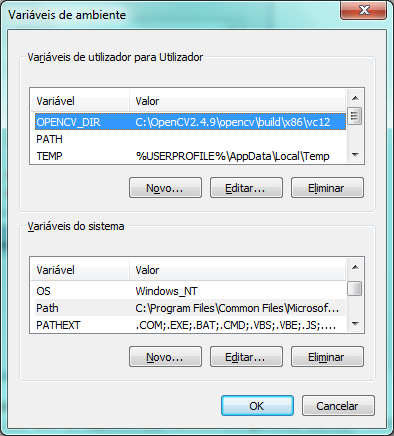
Set the OpenCV enviroment variable and add it to the systems path
First we set an enviroment variable to make easier our work. This will hold the build directory of our OpenCV library that we use in our projects. Start up a command window and enter:
setx OPENCV_DIR D:\OpenCV\Build\x86\vc10     (suggested for Visual Studio 2010 - 32 bit Windows)
setx OPENCV_DIR D:\OpenCV\Build\x64\vc10     (suggested for Visual Studio 2010 - 64 bit Windows)

Open Control Panel → System → Advanced system settings → Advanced Tab → Environment variables...

2 – Install on Linux
.
.
.
.
.
.
.
.
.
.
.
.
.
.
.
.
.
.
.
.
.
.
